The rqti package is designed to be a powerful, stand-alone R library for creating exercises, exams, and questionnaires that fully comply with the QTI v2.1 standard. This tool empowers users to generate QTI-compliant content directly from R, offering the flexibility to render tasks locally (using qtijs) or seamlessly integrate them into learning management systems like OPAL.
Our primary target audience includes instructors specializing in research methods and statistics who want to leverage R’s capabilities while adhering to the QTI standard. In particular, those utilizing OPAL will find rqti especially beneficial, as it fully leverages OPAL’s robust API for smooth integration. However, the package is also suitable for other learning management systems that support the QTI standard.
The versatility of QTI goes beyond exercises and exams; it also supports the creation of comprehensive questionnaires, making rqti an invaluable tool for a wide range of educational and research applications.
Installation
The rqti package is available on CRAN, ensuring easy installation and access to its features:
install.packages("rqti")Quick start
In RStudio, start by navigating to File -> New Project, and then select rqti Project as the project type. For a quick start, you can proceed with the default settings. If you prefer to customize the options, make sure to select YES for Create Templates—this will generate RMarkdown templates tailored for different task types.
Once your project is created, open one of the templates from the working directory (e.g., gap/gap.Rmd). To preview it, simply click Knit. The output will be displayed in the RStudio Viewer or in a new browser window if you are working outside of RStudio.
Explore the other templates to familiarize yourself with the various features and task types that rqti supports. This will help you create tasks that align with your specific needs.
To learn how to create sections and tests, start by reviewing the main.R file in your working directory. This file provides a foundational understanding of structuring your work. For more detailed information, you can refer to the article Sections and Tests.
To add more templates, create a new RMarkdown file. In RStudio, go to File -> New File -> R Markdown -> From Template, and choose one that ends with {rqti}. The simpler templates focus on basic parameters, while the more advanced templates showcase additional settings and customization options. After selecting a template, click the Knit button to render the task in the viewer pane.
While the templates are generally intuitive, you can refer to other articles of the documentation for detailed guidance on specific task types. This will help you fully utilize the features of rqti for your projects. The following task types are available:
- Single-Choice tasks
- Multiple-Choice tasks
- Essay tasks
- Gap tasks
- Dropdown tasks
- Order tasks
- Directed Pair tasks
- Table tasks
To add metadata to your tasks, refer to the article Adding metadata. To integrate various tasks into a test, refer to the article Sections and Tests. For users of the learning management system OPAL, explore the article Working with the OPAL API.
General workflow
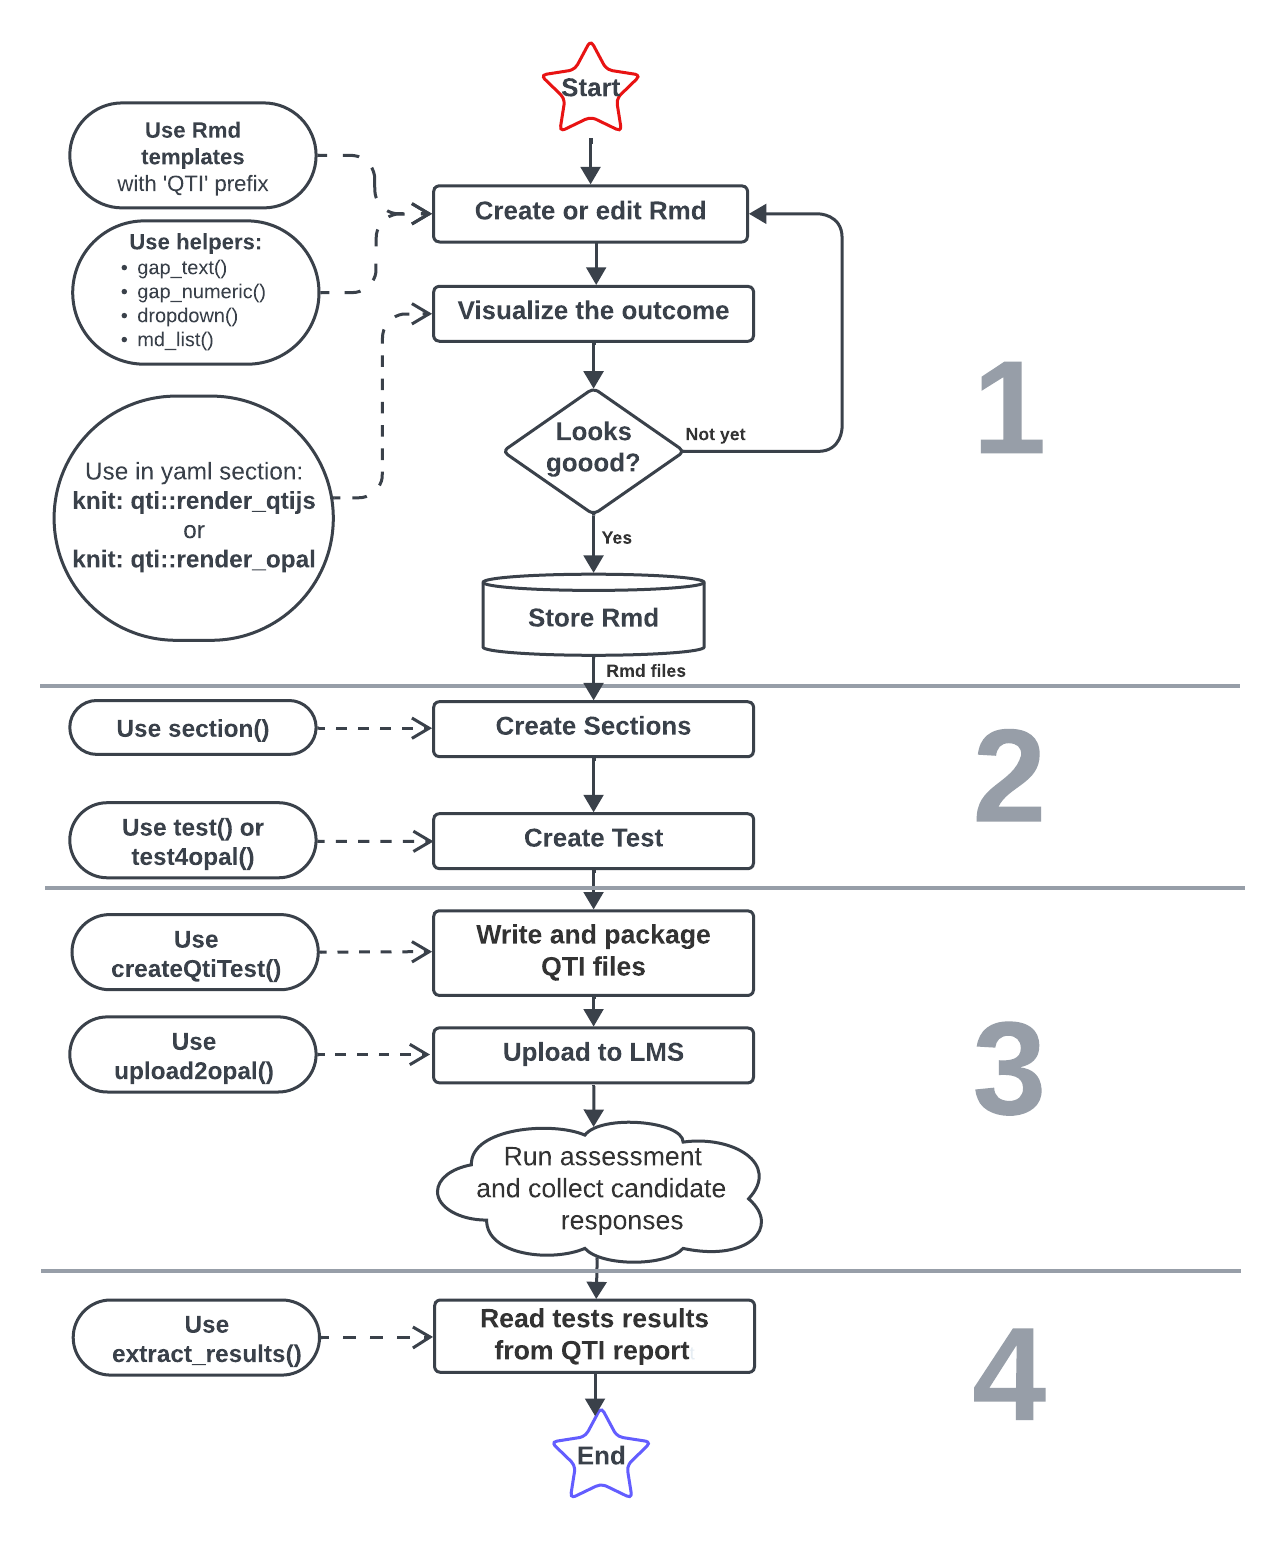
The fundamental workflow with the rqti package involves the following steps:
- Create task files.
- Start by generating an Rmd document. You can either start from scratch or leverage Rmd templates ending with the suffix rqti.
- Create a section titled
# questionand construct your interactions (gaps, choices, etc.) Utilizerqtihelper functions where applicable. - Specify additional attributes in the yaml section. Detailed explanations for all types are available in the Articles menu on this website (top).
- Choose a previewer: Either qtijs (
knit: rqti::render_qtijs), for local rendering, or the learning management system Opal (knit: rqti::render_opal). Note that Opal usage requires prior setup, which is explained in the article Working with the Opal API. - Verify if your task appears as desired. Make adjustments until you are satisfied.
- Create sections and tests based on your task files.
- Write the test (xml) to disk according to the QTI standard and upload the test file to your learning management system.
- Download results data from your learning management system and import them with the
rqtipackage for statistical analysis.
Each step involves specific rqti functions, with the most useful ones illustrated in the following diagram:
The most effective way to grasp the workflow is to create a simple task, such as Single-Choice as demonstrated in the article Single-Choice tasks. Once you have completed that, explore the other task types discussed in the subsequent chapters.
Support and Bug Reports
Should you find any missing features or encounter issues, please do not hesitate to inform us via email (shevandrin@gmail.com) or open an issue on GitHub (https://github.com/shevandrin/rqti/issues). We will offer support until the project’s funding concludes in September 2024. Following that, we will maintain a stable, usable version, with support for new features provided as time permits.